Your Cart is Empty


The 6 Secrets to Flawless Lash Lifts
Ready to take your lash lifts to the next level and achieve those Instagram-worthy results?
Lash lifts may be easy to learn, but it's those little secret tips & tricks that separate the good lash lifts from the great.
If you’re a lash professional looking to perfect your craft and create stunning, eye-catching results,you're in the right place.
In this blog, we'll unveil the tips that will not only elevate your lash lift game but also leave your clients in awe. Get ready to unlock the secrets jaw dropping instagram before & afters every single time.

THOROUGHLY CLEANSE THE LASHES AND SKIN
While it might sound obvious, making sure the lashes and skin are impeccably clean is critical.
If the skin isn’t completely free of oils or makeup then those shields aren’t going to stay in place, resulting in kinked or uneven lashes.
Same goes for properly cleansing the lashes. If there is oil, debris or any kind of makeup residue left on the lashes then the solutions will not process properly, meaning the lashes may not hold their curl.
Invest in a good foaming lash cleanser and somemakeup remover pads and ensure both the skin and the lashes are thoroughly cleansed before you start.
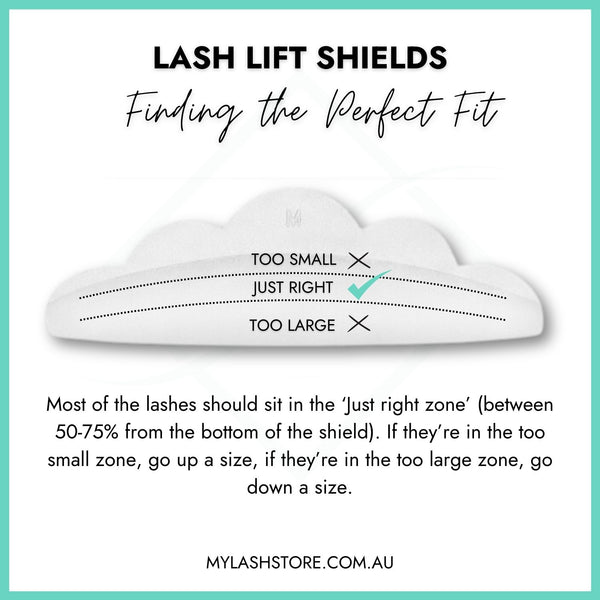
SELECT THE RIGHT LASH LIFT SHIELD
Selecting the right lash lift shield for the job is key. If the shield is too small then the lashes may overcurl or become kinked at the ends. If the shield is too large then the lift may not be dramatic enough. Our lash lift kit comes with 3 different sizes to suit all eye shapes and sizes.
So before you start… measure!
Secure the lower lashes with eye pads or lash tape then find the right sized shield by putting it in place and checking how far up the shield the natural lashes reach. If the most of the lashes only reach half way up the shield then you need to go down a size. If most of the lashes reach further than 75% up the shield then you need to go up a size.
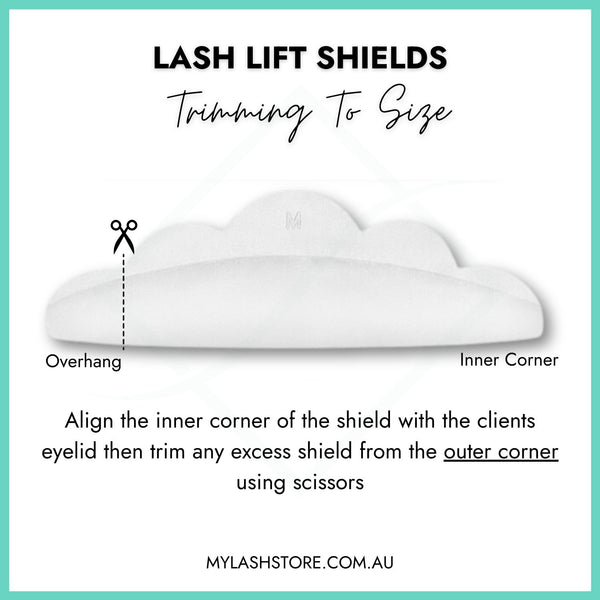
TRIM THE LASH LIFT SHIELD TO FIT
Once you have the correct shield you may find that it’s too wide to comfortably fit the clients eyelid. This can cause the shield to lift away from the skin or move around during application so it’s extremely important to cut off any excess from the outer edge.
To do this properly align the inside corner of the shield with the inside corner of the clients eyelid, then use scissors to trim away the excess overhang from the outer corner to ensure a snug fit.
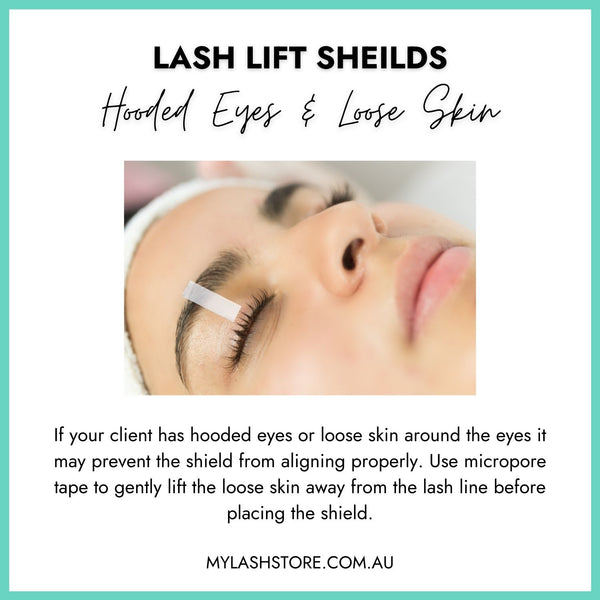
PERFECT YOUR SHIELD PLACEMENT
This is the most important step of all.Correct placement is the difference between a poor lift and an amazing one. Make sure that the shield is aligned with the lash line as closely and neatly as possible. Any gaps between the shield and the lash line will affect the lift.
Tip:If your client has hooded eyes or loose skin around the eyes it may prevent the shield from aligning properly. Use micropore tape to gently lift the loose skin before placing the shield.
USE LESS LASH LIFT ADHESIVE
When it comes to lash lift adhesive, less is more. If too much is applied to the shield it may not become tacky enough to stay in place.
Tip:If you still have trouble with the shield staying in place use micropore tape horizontally across the eyelid before placing the shield down as it should adhere to the tape easier than it can to the clients skin.
PRACTICE, PRACTICE, PRACTICE
You’re now armed with all the knowledge you’ll ever need to provide flawless lash lifts, but it will take a little time (usually around 10-20 lifts) before you’ll truly feel like you’ve perfected them.
So be patient with yourself, take your time and keep at it. Before you know it you’ll be confidently creating perfect lash lifts without even thinking about it.
Learn more about our best selling professional lash lift & brow lamination kit or shop our full collection of lash lift products